A lot of athletes arrive at our sports physical therapy clinics with the same complaint phrased in different ways. A runner from Plymouth says the outside of the knee keeps barking late in runs. A dancer from the South Shore says balance on one leg feels shaky. An ACL patient says squats are back, but cutting still feels off.
Often, the problem isn't just the knee, ankle, or low back. The hip abductors aren't doing their share.
At PTU, we look at this through a sports PT lens first. For runners, dancers, field and court athletes, and post-op patients, hip abductor strength matters because it influences how you control your pelvis, femur, and knee when your body is loaded on one leg. If you've been searching for how to strengthen hip abductors, the answer isn't a random list of band drills. It's a progression that starts with clean activation, builds usable strength, and then transfers that strength into sport.
Table of Contents
- Why Your Hip Abductors Are Your Secret Weapon
- Assess Your Starting Point with a Simple Movement Screen
- The 3-Phase Hip Abductor Strengthening Program
- Perfecting Your Form Common Mistakes and Cues
- Programming Your Workouts Sets Reps and Frequency
- Sample Routines for Specific Goals
- When to See a Physical Therapist and FAQs
Why Your Hip Abductors Are Your Secret Weapon
Late in a run, during a landing sequence in dance, or in the early months after surgery, the same pattern shows up fast. The pelvis drifts, the femur loses position, and the knee starts taking stress it was never meant to manage alone.
Your hip abductors help prevent that.
The main contributors are the gluteus medius and gluteus minimus. Their job is straightforward. They hold the pelvis level, control the thigh in single-leg stance, and give you a more stable base to push from when you run, cut, hop, or decelerate. In the clinic, I rarely frame them as “small accessory muscles” because that misses their real role. They are key control muscles for athletes who live on one leg at a time.
That matters because hip abductor deficits rarely announce themselves at the side of the hip first. A runner may only notice lateral knee irritation. A dancer may feel unstable in turnout or during repeated single-leg work. A field sport athlete may describe a loss of control when planting and changing direction. For runners dealing with outside knee irritation, this guide on pain relief for ITBS and runner's knee gives a useful overview of how those symptoms can show up during training.
Strong abductors improve more than a side-lying leg raise. They improve force transfer, balance, and frontal-plane control under fatigue.
That last point is where programming matters. I see motivated athletes waste time doing high-rep band work that creates a burn but never changes how they move. If the pelvis keeps rotating, the trunk keeps shifting, or the femur keeps drifting inward, the exercise is not solving the problem you have.
A better approach is progressive. Runners need control that holds up over repeated ground contacts. Dancers need precision, end-range control, and symmetry. Post-op patients need the right dose at the right time so strength improves without provoking symptoms or reinforcing compensations. The goal is not to “feel” the hip abductors. The goal is to train them well enough that your mechanics stay cleaner when speed, fatigue, and load go up.
Assess Your Starting Point with a Simple Movement Screen
Before you load anything, check how you control your body on one leg. This screen won't diagnose an injury, and it doesn't replace an in-person evaluation with a licensed DPT, but it can tell you whether your current control is clean enough to start building from.
Use a mirror and keep the test simple
Use a mirror if you have one. If posture tends to throw off your balance testing, it's worth learning how to evaluate your spinal alignment so you're not blaming the hip for a setup problem.
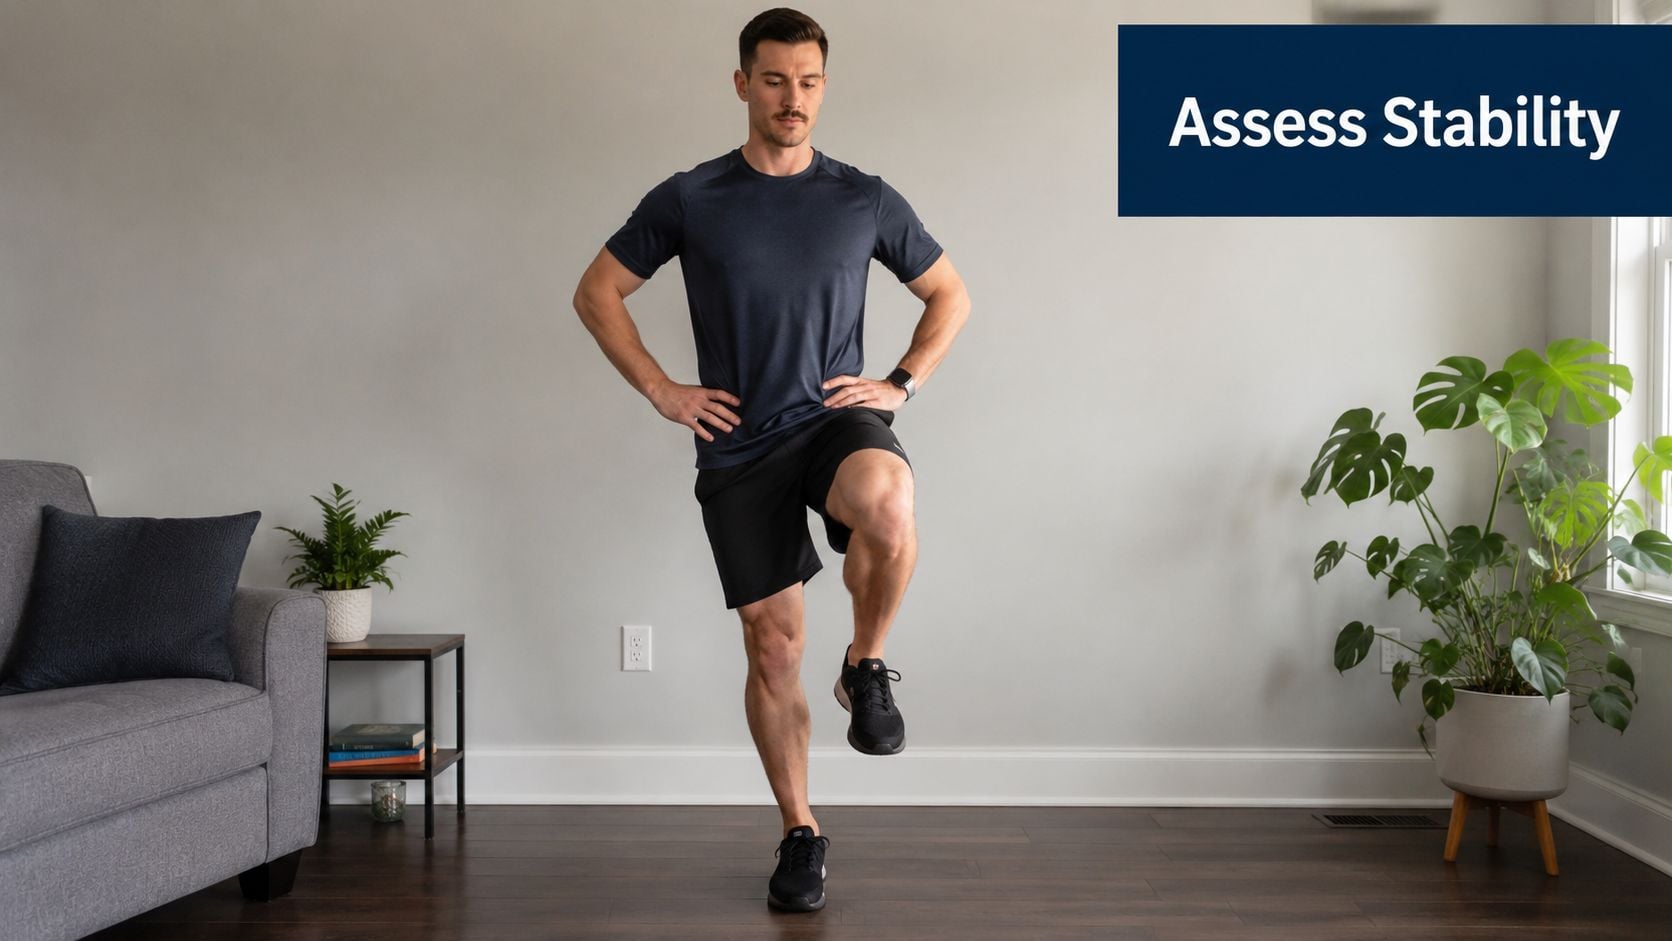
Try this single-leg stance screen:
- Stand tall near a wall or counter. You shouldn't need to hold on, but it's smart to have support nearby.
- Shift onto one leg. Slight bend in the standing knee. Don't lock it out.
- Lift the opposite foot off the floor. Keep your torso quiet.
- Watch your waistband or belt line in the mirror. It should stay fairly level.
- Notice what your trunk does. If you lean heavily to one side, that matters.
- Repeat on the other leg. Many athletes feel a clear difference side to side.
At our Bridgewater, Massachusetts clinic, we often pair simple screens like this with a more detailed movement analysis. For runners, that may include running gait analysis. For field and court athletes, it may include single-leg loading, landing mechanics, and return-to-sport testing.
What a hip drop actually means
A hip drop, often referred to clinically as a Trendelenburg-type sign, is what happens when the pelvis can't stay level during single-leg support. Sometimes the pelvis dips on the non-stance side. Sometimes the body hides that by leaning the trunk over the stance leg.
Neither pattern automatically means you're injured. It does tell you the system isn't controlling load well.
Look for these signs:
- Pelvis drifting out of level instead of staying steady over the standing leg
- Torso leaning sideways to “find” stability
- Foot gripping the floor hard or the toes clawing for balance
- Standing knee drifting inward as you try to stay upright
- Quick fatigue even though the task seems easy
If you can't own a quiet single-leg stance, don't expect a clean single-leg squat, a stable running stride, or a sharp lateral cut.
A screen like this is educational. It doesn't tell you why the pattern exists. Stiffness, pain, prior surgery, ankle control, trunk strategy, and training fatigue can all affect the result. If the movement feels painful, unstable, or very asymmetrical, that's a good reason to get evaluated instead of guessing.
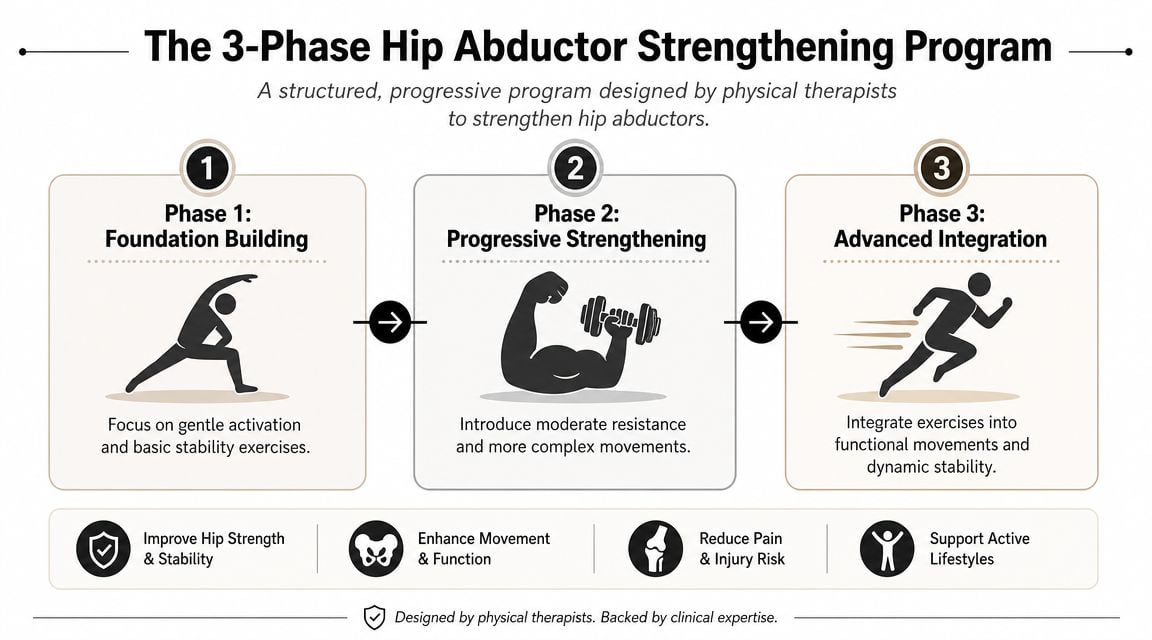
The 3-Phase Hip Abductor Strengthening Program
A good hip abductor program follows the same logic we use in sports rehab. Earn control first, then build strength, then prove that strength under speed, impact, and fatigue. That progression matters for runners trying to clean up single-leg stance, dancers who need precision at end range, and post-op athletes who cannot afford to skip steps.
The exercise that belongs in your plan is the one that puts load on the lateral hip without obvious compensation. Early rehab often starts with simple open-chain work because it lets the athlete feel the right area and keep the pelvis organized. Later phases shift toward closed-chain loading, then sport-specific tasks that challenge pelvic control during real movement demands.
Phase 1 activation and control
Phase 1 fits athletes who lose pelvic position under low load, feel the work in the low back instead of the side hip, or are early after surgery and rebuilding basic control. The goal is not fatigue for its own sake. The goal is clean reps that teach the gluteus medius and related stabilizers to do their job.
Side-lying hip abduction
Lie on your side with the pelvis stacked and the top leg straight. Lift the leg only as high as you can without rolling backward or hiking the hip. This remains one of the best starting drills because it simplifies the task and gives clear feedback.Clamshell
Bend the hips and knees, keep the feet together, and open the top knee without letting the trunk or pelvis rotate. If an athlete cannot feel this in the side hip, I usually shorten the range and slow the lowering phase.Bridge with band awareness
Place a light band above the knees and lift into a bridge while keeping the knees aligned over the feet. It is not a pure abductor exercise, but it helps connect trunk stiffness, pelvic control, and hip position.
A useful target in this phase is a moderate rep range with slow tempo and a brief pause at the top. Stop the set when the pelvis starts to rotate, the low back takes over, or the work shifts out of the lateral hip.
Some athletes also need exercise selection adjusted around joint irritability. If pinching is part of the presentation, review these hip impingement exercises to avoid before adding more range or resistance.
Later in the phase, some athletes also benefit from broader training ideas like the Full Circle Function & Fitness strength insights, especially when they need to connect isolated strength work to full-body loading habits.
After you've practiced the basics, this video shows one practical way to coach abductor-focused work.
Phase 2 loaded strength
Phase 2 builds usable capacity. The question changes from whether you can find the muscle to whether you can keep the pelvis, femur, and trunk under control once resistance increases.
Lateral band walk
Place a band around the thighs or ankles, soften the knees, and step sideways while keeping constant tension in the band. Short, controlled steps usually train the target better than big steps that turn into a sway.Monster walk
Step on a diagonal forward and backward under band tension. Keep the toes mostly forward and the feet far enough apart that the band stays loaded.Side plank with top-leg lift or isometric hold
This adds a trunk demand that exposes weak links fast. It works well for runners and field athletes who collapse through the torso during single-leg tasks.
This is the phase where athletes often make the wrong trade-off. They reach for a heavier band, but the pelvis rotates, the feet drag, and the drill stops looking like strength work. I would rather see fewer clean steps than more ugly ones.
Phase 3 functional and sport-specific power
Phase 3 tests whether the new strength carries into athletic movement. The hip abductors now have to manage deceleration, frontal-plane control, and force transfer while the rest of the body is moving.
Single-leg squat
Sit back into a controlled squat on one leg. Depth matters less than keeping the pelvis level, the knee tracking well, and the trunk steady.Lateral step-down
Stand on a box or step and lower the opposite heel toward the floor under control. This drill often transfers well to stairs, downhill running, and return-to-running progressions.Lateral hop and stick
Hop sideways and land on one leg. Pause long enough to show you can own the landing instead of bouncing out of it.
For runners, phase 3 should resemble the demands of repeated single-leg stance and late-run fatigue. For dancers, I bias this phase toward control at end range, turnout demands when appropriate, and precision on landing. For post-op ACL patients, I pair these drills with broader return-to-sport testing before cutting and jumping volume climbs.
Progress because the current level is controlled, not because it feels repetitive.
In our clinics across Bridgewater, Buzzards Bay, and Middleborough, this phase becomes highly individual. Some athletes need hands-on treatment or dry needling to reduce guarding so they can train the pattern well. Others need running gait analysis, dance therapy, or formal return-to-sport testing to confirm that the strength they built in rehab still holds up when speed and complexity increase.
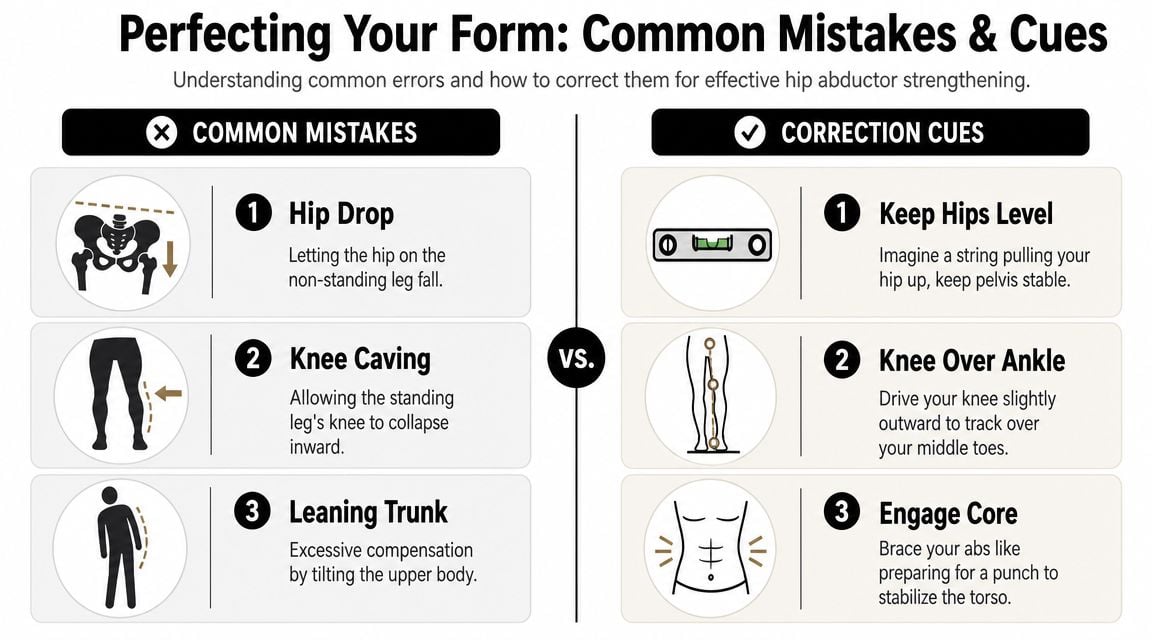
Perfecting Your Form Common Mistakes and Cues
A strong program can still miss the target if the body finds an easier strategy. In the clinic, I see this all the time with runners trying to push mileage, dancers chasing clean lines, and post-op athletes eager to get back to higher-level work. The exercise stays the same, but the load shifts away from the hip abductors and into trunk motion, pelvic rolling, or stiff-kneed positioning.
The compensations that steal the work
The goal is not bigger motion. The goal is the right muscle doing the job.
In clamshells and side-lying abduction, the common cheat is pelvic rotation. The athlete rolls backward, gets more range, and loses the training effect. In standing drills, trunk sway often shows up first. If the torso rocks side to side, momentum is doing part of the work your lateral hip should control.
A few other errors show up often in Phase 1 and Phase 2:
Knee locking
A rigid standing knee makes the movement harder to control and usually pushes load away from the hip.Foot drag
In lateral walks, the trailing leg should stay active. If the foot scrapes, the set has usually turned into a shuffle instead of a strength drill.Band slack
If tension disappears between steps, the abductors get a break every rep. That lowers the challenge and makes the set less useful.Toe-out compensation
Athletes often turn the foot outward to get the leg farther away from the body. That can make the drill look stronger than it is.
If the front of the hip feels pinchy during these drills, adjust quickly rather than forcing through it. Some athletes need a small change in angle, range, or setup. If that pattern keeps showing up, this guide on hip impingement exercises to avoid can help you sort out which positions tend to irritate the joint.
Simple cues that clean it up fast
Good cues are short, specific, and easy to repeat under fatigue.
- For pelvic rotation: “Keep your zipper facing forward.”
- For trunk sway: “Stay tall. Move the leg, not the torso.”
- For knee collapse: “Track the knee over the middle toes.”
- For locked knees: “Keep a soft bend.”
- For band slack: “Create tension before the step, then keep it.”
- For toe-out: “Keep the kneecap and toes pointed where you started.”
I also coach athletes to watch for where they feel the exercise. Lateral hip effort is expected. Cramping in the low back, gripping in the front of the hip, or a heavy burn in the quads usually means the setup needs to change.
Ten clean reps beat twenty sloppy ones every time.
That is not just a cue for beginners. It is how progression works in a sports rehab setting. If a runner cannot hold pelvic control on rep eight, there is no reason to add resistance on rep nine. If a dancer loses alignment at end range, the answer is usually better control, not more motion. If a post-op athlete cannot keep the femur and pelvis organized, adding speed too early just rehearses the compensation.
Quality is the standard. Then load, range, tempo, and complexity can build on top of it.
Programming Your Workouts Sets Reps and Frequency
Programming matters because the hip abductors respond best to repeated, high-quality exposure, not random volume. In the clinic, I usually start athletes with 2 to 4 sessions per week, then adjust based on soreness, sport demands, and how well they hold pelvic control late in the set.
The dosage changes across phases. Early work is usually controlled and repeatable. Later work asks for more force, more single-leg demand, or more fatigue resistance.
A simple programming table
| Goal | Phase | Sets | Reps / Duration | Frequency |
|---|---|---|---|---|
| Rebuild control | Phase 1 | 2 to 3 sets | 8 to 12 clean reps per side | 3 to 4 times per week |
| Build banded strength | Phase 2 | 2 to 4 sets | 10 to 15 reps, or 8 to 12 steps each direction | 2 to 3 times per week |
| Hold quality under fatigue | Phase 2 | 2 to 3 sets | 20 to 40 seconds, or short continuous sets | 2 to 3 times per week |
| Own functional single-leg strength | Phase 3 | 3 to 4 sets | 5 to 8 reps per side, stop before form slips | 2 to 3 times per week |
Use the table as a framework, not a script.
A runner in season often does better with brief sessions added after easy runs or on strength days. A dancer may need lower external load but stricter alignment standards and more frequent low-fatigue practice. A post-op patient usually needs more recovery between demanding single-leg sessions, especially once step-downs, carries, or landing drills enter the plan.
How to choose sets and reps
Match the dose to the job.
Phase 1 is about finding the muscle and keeping the pelvis organized. Higher reps can work well here, but only if each rep still looks sharp. If rep 11 turns into trunk sway and hip flexor gripping, the set was too long.
Phase 2 is where many athletes need more intent. Bands, standing positions, and longer levers raise the challenge. Moderate rep ranges usually work better than marathon sets because they let you keep tension where you want it.
Phase 3 should look more like the demands of sport. That often means fewer reps, more load, more single-leg work, and stricter stopping points. For runners, that may be controlled endurance under repeated stance. For dancers, it may be precision at larger ranges. For post-op athletes, it may be gradual return to force production without losing alignment.
How to progress without guessing
Change one variable at a time after you can complete all prescribed sets with clean mechanics and the exercise still feels controlled the next day.
Useful progressions include:
- Add resistance with a stronger band, cable, or weight
- Increase the lever arm by moving from bent-knee to straight-leg positions
- Shift to standing or single-leg tasks to raise the coordination demand
- Add tempo or pauses to improve control in the hardest part of the movement
- Build sport carryover by progressing from basic strength to step-downs, hops, or lateral power drills
That last step matters. Hip abductor training should eventually fit into a broader strength and conditioning program for athletes, especially if you are returning to speed, cutting, or high training volume.
One final rule keeps programming honest. If form breaks down, the set is over. Clean work done consistently beats extra reps that rehearse the wrong pattern.
Sample Routines for Specific Goals
The same muscles matter across sports, but the routine shouldn't look identical for everyone. A runner, a dancer, and a post-op athlete each ask different things of the hip.
For runners
A runner from Raynham or Plymouth usually needs repeatable single-leg control under fatigue. The issue often shows up late in a run, not in the first few steps.
A simple runner-focused session might include:
- Side-lying hip abduction to start with clean activation
- Lateral band walks to build frontal-plane control
- Single-leg squat to connect the work to stance mechanics
The reason this works is straightforward. Running is a long series of single-leg landings and stabilizations. If you want more ideas around that transition from rehab to training, these physical therapy exercises for runners fit well with this progression.
For dancers
Dancers need control where many athletes don't spend much time. They also need precision, not just strength.
A dancer-focused routine might use:
- Clamshells for early awareness without excessive load
- Side plank variations for trunk and pelvic control
- Lateral step-downs to train clean alignment during single-leg lowering
The difference is the standard. Dancers often need the pelvis to stay organized at larger ranges and during more exact movement patterns. That's why dance therapy matters. You can't just hand a dancer a generic band circuit and expect it to transfer to turnout, balance, and repeated rehearsal demands.
For post-op athletes
After ACL surgery or another orthopedic procedure, the first goal is usually not “make it burn.” It's re-establishing control so the leg can accept load safely.
A foundational post-op routine often includes:
- Bridge with band awareness
- Side-lying hip abduction
- Supported single-leg squat or controlled step-down progression
The why matters here. Post-op athletes commonly need to reduce knee valgus patterns, restore confidence on one leg, and build enough proximal control to support later return-to-sport work. This is also where in-person progression matters most, because tissue healing status, swelling, pain response, and surgical timeline all affect what's appropriate.
The right routine is the one that matches your sport, your current capacity, and the quality of the movement you can actually own today.
When to See a Physical Therapist and FAQs
Some hip abductor weakness responds well to a smart home program. Some doesn't. If the movement keeps breaking down, pain keeps rising, or you can't train your sport without compensation, it's time for a closer look.
When self-directed exercise isn't enough
See a licensed physical therapist if you notice any of the following:
- Sharp pain in the hip, groin, knee, or low back during these drills
- Painful clicking or catching that doesn't settle
- A visible limp or major hip drop during walking or stairs
- Inability to balance on one leg without repeated loss of control
- Ongoing symptoms after surgery that make progression unclear
- Trouble returning to running, dance, jumping, or cutting despite consistent work
For athletes around Bridgewater, Massachusetts, as well as East Bridgewater, West Bridgewater, Taunton, Raynham, Buzzards Bay, and Middleborough, an in-person evaluation helps sort out whether the issue is hip abductor weakness, a mobility restriction, a pain-driven compensation, or a bigger return-to-sport problem.
FAQs
Q: Can I do hip abductor exercises every day?
A: Some low-load activation work may be tolerated frequently, but harder strength and functional work usually needs recovery. Most athletes do well when they train these patterns regularly without forcing high-fatigue sessions daily.
Q: How long does it take to notice improvement?
A: That depends on your starting point, your consistency, your exercise quality, and whether pain or surgery is part of the picture. Most athletes notice control changes before they notice major strength changes.
Q: What if I feel the front of my hip instead of the side?
A: That usually means your setup, pelvic position, or exercise selection needs adjustment. Don't just push through it.
Q: Are bands enough?
A: Sometimes. Bands are useful, especially early and in Phase 2, but athletes often need progression into single-leg and sport-specific loading if they want carryover.
Q: Is this medical advice?
A: No. This is educational guidance reviewed through a sports physical therapy lens. For individual diagnosis and treatment, see a licensed PT.
If you want a hip program that's built around your sport and your actual movement, book an evaluation with Physical Therapy U. Our licensed DPTs work with runners, dancers, youth athletes, and post-surgical patients across Bridgewater, Buzzards Bay, and Middleborough to build progressive plans that move from pain reduction and strength to gait analysis, dry needling, return-to-sport testing, and sport-specific performance.