You taped your knee before practice because a teammate said it helped. Or your daughter came home from soccer with bright strips on her shoulder and asked if she should keep doing it. That's usually where the central question begins.
In sports physical therapy, how to use kinesiology tape matters, but the bigger question is whether tape is the right tool for the job. For a runner with mild knee irritation, a volleyball player who needs better shoulder awareness, or an athlete early in ACL rehab, tape can be useful. For a structural problem, an unstable joint, or pain that keeps escalating, it won't fix the root cause.
That's the lens we use in sports PT across the South Shore of Massachusetts. Tape can help with symptom control, movement feedback, and short-term support while you train, rehab, or return to sport. It's not magic, and it shouldn't replace an evaluation when something feels off.
Table of Contents
- Taping Is a Tool Not a Cure
- The Ground Rules for Safe Taping
- Cutting and Applying Tape with Proper Tension
- Example Applications for Common Sports Injuries
- What the Evidence Says About Kinesiology Tape
- Common Taping Mistakes and How to Fix Them
- When Tape Is Not Enough See a PT
Taping Is a Tool Not a Cure
A lot of athletes assume the tape itself is the treatment. It isn't.
The more useful question is, “Is this the right tool for my problem?” Hospital for Special Surgery describes kinesiology tape as a short-term adjunct for mild-to-moderate pain, exercise support, or posture cues. It may help activate muscles and support joints, but it works best when it's part of a larger plan and applied by someone with experience, as noted in HSS guidance on kinesiology tape.
That fits what we see in sports PT. If an athlete has patellar tendon pain, shoulder irritation, or a recent ankle sprain, tape can sometimes make movement feel cleaner or more tolerable. If the athlete thinks tape will stabilize a loose shoulder, protect a fresh ligament injury by itself, or erase poor training decisions, expectations need to change.
Practical rule: Put a purpose on the tape before you put it on the skin.
Good reasons to tape include:
- Pain modulation: The area hurts, but movement is still safe and useful.
- Proprioceptive input: The athlete needs better body awareness during cutting, landing, throwing, or running.
- Movement support during rehab: Tape helps them tolerate drills while strength, mobility, and control catch up.
- Posture or position cueing: Common with runners, dancers, and athletes coming back after surgery.
Bad reasons to tape include:
- Trying to create structural stability: Elastic tape doesn't replace bracing, joint protection, or tissue healing.
- Ignoring worsening symptoms: More tape on a bigger problem is still a bigger problem.
- Using it instead of rehab: If you're skipping the actual work, tape won't carry the load.
If you want a plainspoken version of that bigger idea, this piece on why one visit to a PT is better than any magic pill, brace, sock, or drink for foot pain makes the same point. Tools matter. Clinical reasoning matters more.
The Ground Rules for Safe Taping
Before you worry about patterns, worry about skin. Most taping failures start there.
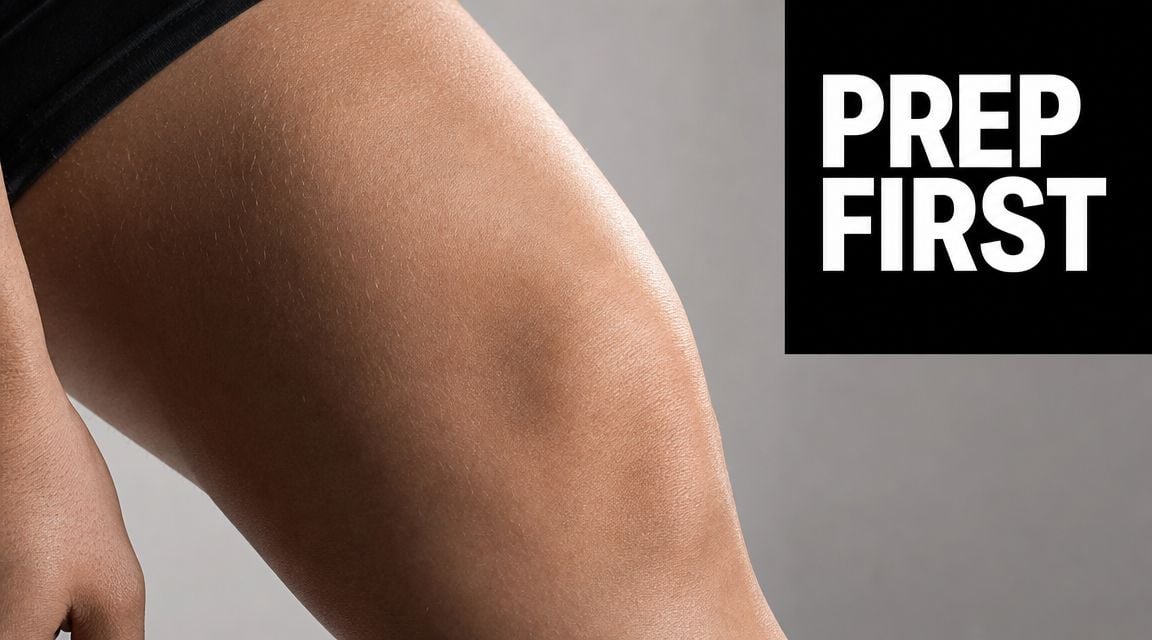
A clinician-grade workflow starts with clean, dry, oil-free skin. Guidelines also state that the starting and ending 2 to 3 cm of tape should be applied with zero stretch, sports use should include waiting at least 10 minutes after application before activity, and wear time should be limited to 24 hours before reassessment, according to this sports taping guideline in PMC.
That's not busywork. Sweat, lotion, sunscreen, and damp skin all make the tape peel early. Overstretched ends irritate the skin fast, especially behind the knee, on the shoulder, or around the ankle.
Prep the area like you mean it
Use a simple checklist:
- Wash and dry the area: Soap and water is usually enough. Don't tape over lotion, massage oil, or fresh sweat.
- Trim longer hair if needed: You don't need to shave everything, but dense hair makes adhesion worse and removal more irritating.
- Check the skin first: If the area already looks angry, tape usually makes it angrier.
- Apply the anchors with no stretch: The tape ends should lie down gently, not pull on the skin.
Tape should feel noticeable, not aggressive.
Know when not to tape
There are also times when taping at home isn't a smart idea.
Avoid kinesiology tape over:
- Open skin: Cuts, scrapes, blisters, or healing incisions
- Irritated or reactive skin: Rashes, itching, or prior tape reactions
- Active skin problems: If the skin looks infected or inflamed, skip it
- Areas where you can't monitor the response well: Especially if the athlete tends to “set it and forget it”
If tape causes itching, burning, or increased redness, remove it. That response is more important than trying to “get your money's worth” out of one application.
Use a short cycle, not a set-it-and-forget-it mindset
A lot of athletes leave tape on too long because it still looks attached. That's not the right test.
Daily skin status changes with training load, showering, heat, and sweat. Reassessing after short wear is safer and more useful than assuming the same strip should stay on for days.
Cutting and Applying Tape with Proper Tension
Most DIY taping goes wrong in one of two places. The tape is cut poorly, or the tension is guessed.
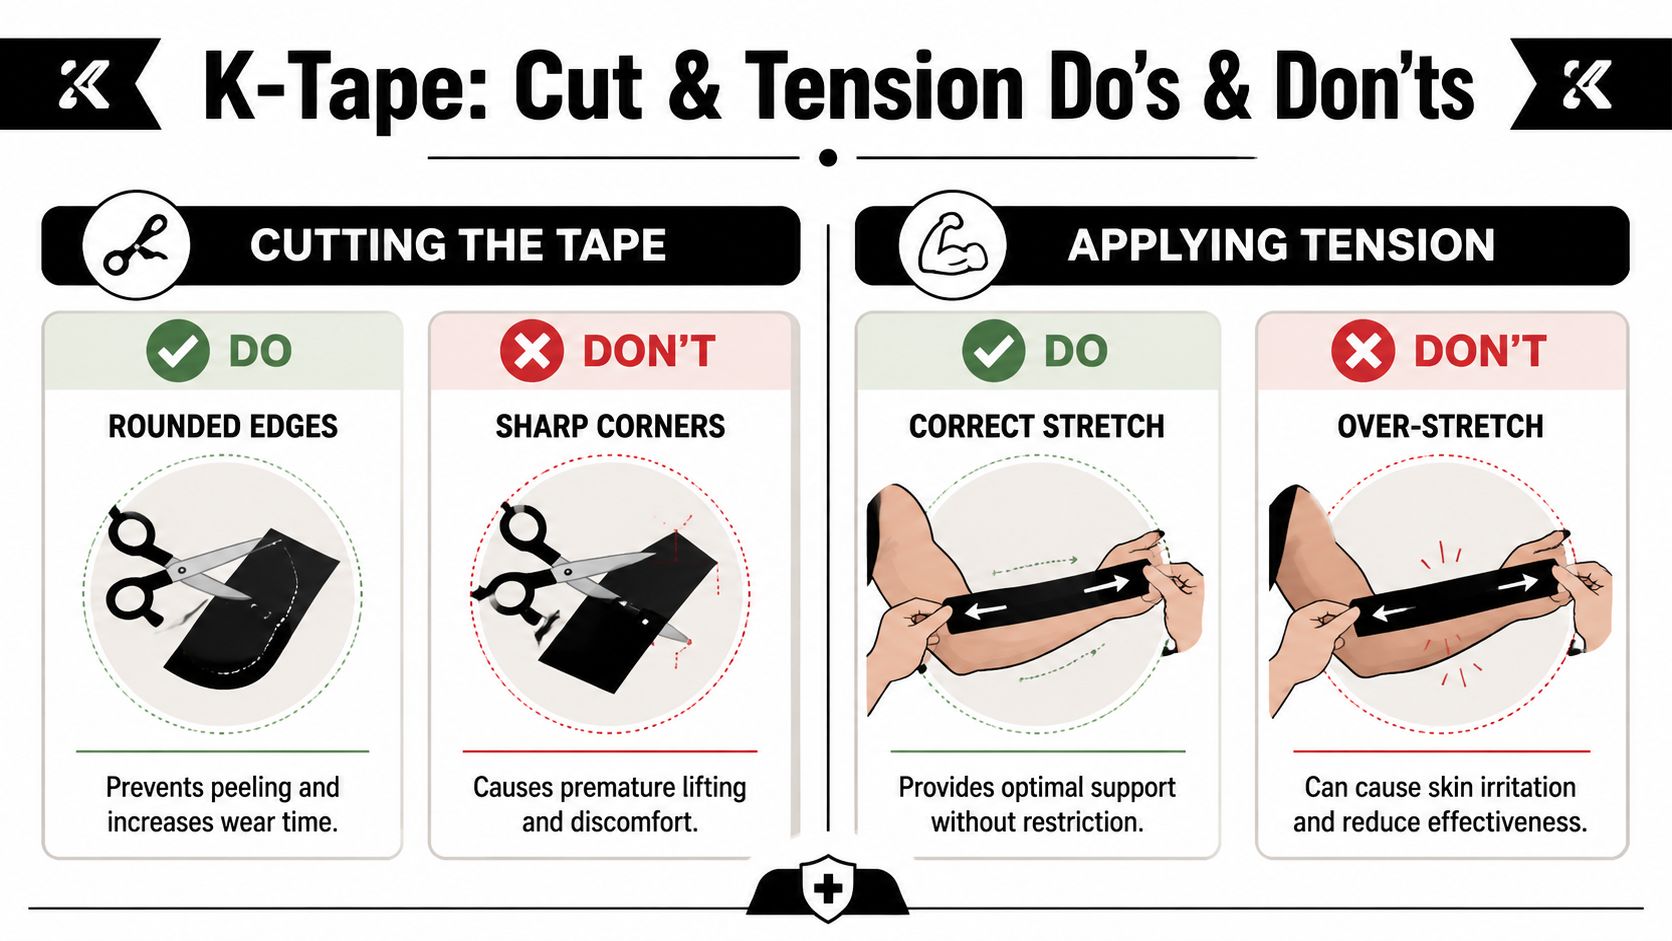
The basic method is consistent across many sports taping guides. The first and last two inches are anchored without stretch, the middle segment is tensioned based on the goal, the tape is rubbed after application to help the adhesive bond, and for sports it's often applied about an hour before activity, as described in this clinician taping guide from Excell Sports.
Choose the strip based on the job
You don't need a huge library of patterns to use tape well. Start with a few strip types:
- I strip: Best for straightforward support along one line, like calf, IT band, or low back applications.
- Y strip: Useful when you want the tape to wrap around a muscle belly or frame the kneecap or shoulder.
- X strip: Better when the painful point sits near the center and movement happens in more than one direction.
- Fan strip: Often used when the goal is broader coverage over swelling or bruising rather than a narrow support line.
Rounded edges help. Sharp corners catch on socks, shirts, and knee sleeves and lift earlier.
Control the anchors first
Anchors are the easiest part to overlook and one of the fastest ways to irritate skin. Lay down the first section with no stretch. Do the same at the end.
Then tension only the working middle. If the tape feels like it's yanking the skin at the ends, start over.
A few practical cues help:
- Peel the backing in stages: Don't expose the whole strip at once unless you're very comfortable with the pattern.
- Position the body first: Put the joint or muscle in the position you want before sticking tape down.
- Smooth, don't yank: Controlled stretch is the goal.
- Rub the finished tape: Friction helps the adhesive set.
Kinesiology Tape Tension Guidelines
The exact pattern depends on the athlete and the body part, but the big idea is simple. Match the tension to the goal.
| Therapeutic Goal | Tension Guideline | Common Use Case |
|---|---|---|
| Anchor protection | Zero stretch at the first and last two inches | Any application where you want to protect the skin |
| General support through the middle | Controlled tension in the central segment | Broad support pattern over a muscle or tendon |
| Pain-control pattern for calf support | About 50% stretch | Calf pain during running or jumping |
| Focal symptom area with overlay strip | No stretch on base strip, added stretch only over the symptomatic spot | Small hotspot of pain or irritation |
Notice what's missing from that table. There isn't one magic percentage for every body part.
The best tape job is usually the simplest one that stays on, feels comfortable, and matches the reason you taped in the first place.
If you're learning how to use kinesiology tape at home, keep your first few applications boring. Clean skin, rounded edges, zero-stretch anchors, moderate central tension, and a quick skin check afterward will get you farther than trying to copy a complicated social media pattern.
Example Applications for Common Sports Injuries
The safest home applications are the ones that keep the goal narrow. You're not trying to rebuild the joint with tape. You're trying to make movement feel a little better while you keep an eye on how the athlete responds.
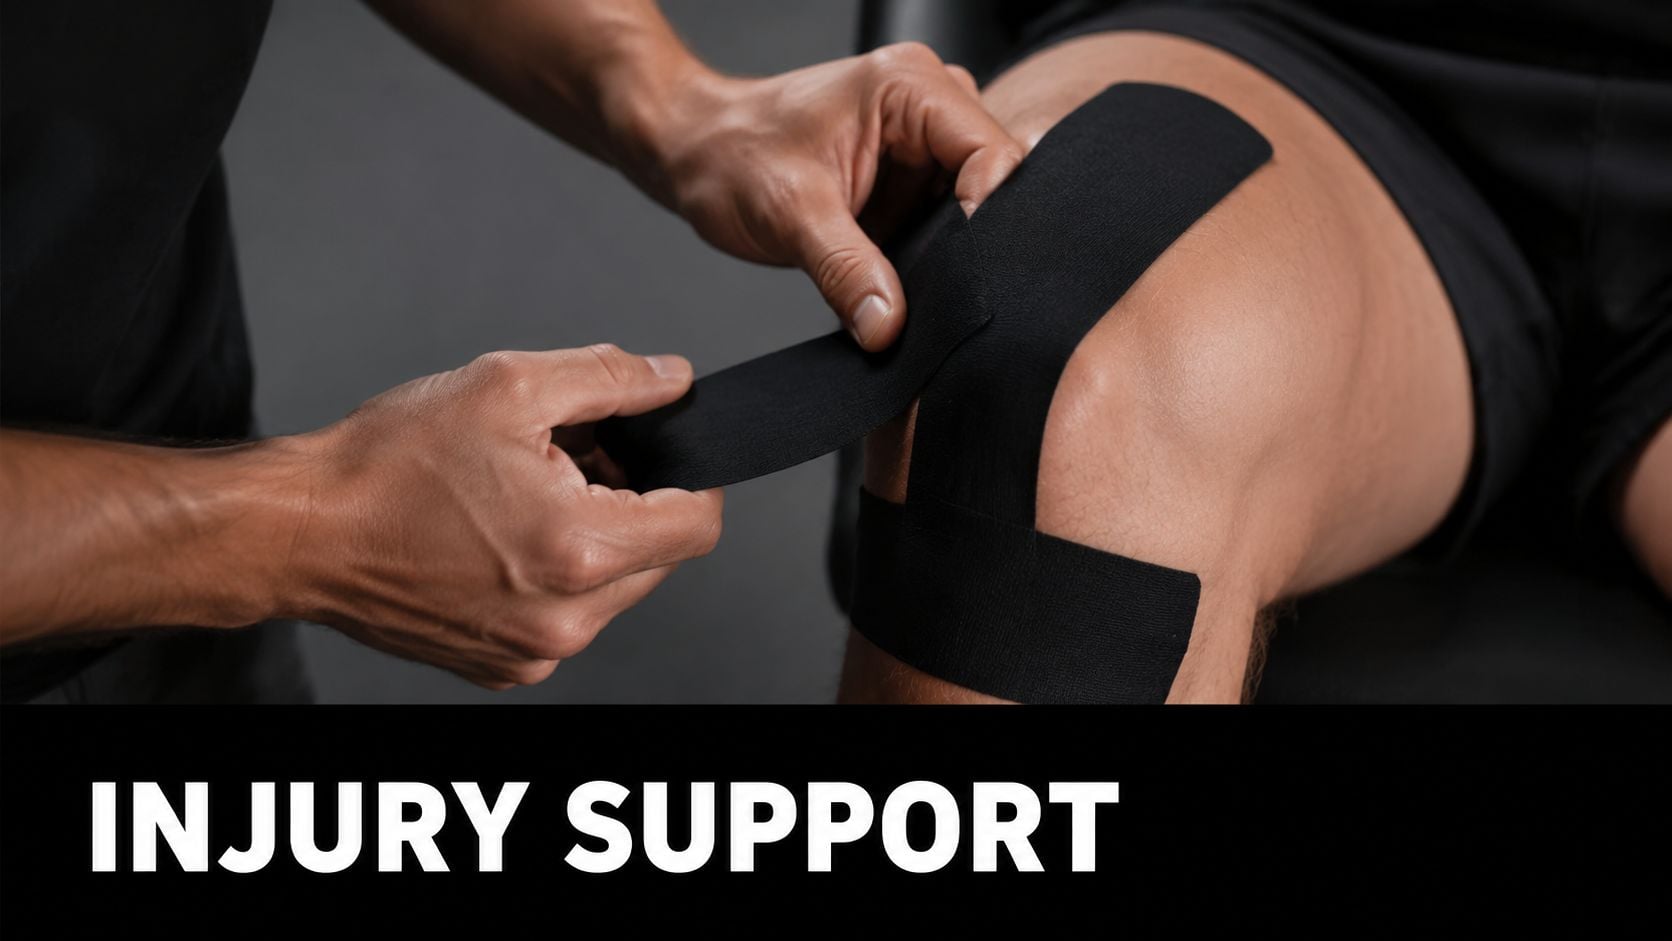
These examples are intentionally simple. They're a starting point for athletes in Bridgewater, Plymouth, Taunton, East Bridgewater, West Bridgewater, Raynham, Buzzards Bay, and Middleborough who want a short-term support option, not a substitute for evaluation.
General knee pain for runners and field athletes
For front-of-knee irritation, the goal is usually comfort and movement cueing, not “holding the knee in place.”
Try a basic Y-strip pattern:
- Sit with the knee slightly bent.
- Anchor the base of the strip below the kneecap with no stretch.
- Split the strip and guide each tail around the kneecap with gentle tension through the middle.
- Finish each tail above the kneecap with no stretch.
- Rub the tape to set the adhesive.
This works best for mild runner's knee symptoms, training irritation, or situations where the athlete says, “It just feels better when I have some support there.” If stairs, squats, or running are getting worse despite taping, that's your signal to stop treating tape like the answer.
Shoulder support for overhead athletes
For baseball, softball, volleyball, and swimming, kinesiology tape can be useful as a movement reminder. It's not going to create true shoulder stability.
A simple shoulder support option:
- Start with the arm in a comfortable position, not cranked into an extreme stretch.
- Apply one I-strip from the upper arm toward the shoulder with controlled middle tension.
- Add a second strip across the top or back of the shoulder only if the first strip improves comfort.
The athlete should still be able to move normally. If the tape makes them feel blocked, pinched, or weak, the pattern is wrong or the shoulder needs a real assessment.
For athletes doing lower-leg training and recovery work alongside return-to-play progressions, this guide on leg recovery for BionicGym users is a reasonable add-on resource because it speaks to calf support and recovery habits that often matter just as much as the tape itself.
Ankle feedback after a sprain
This is one of the more useful situations for kinesiology tape. The goal is often proprioceptive feedback after a mild sprain or during the later stages of rehab.
Use a simple I-strip or two-strip setup:
- Position the ankle in a neutral, comfortable angle.
- Anchor under the foot or near the lower leg with no stretch.
- Guide the middle section around the ankle with controlled tension.
- End with no-stretch anchors on the skin.
- Walk a few steps before practice and make sure the tape feels supportive, not restrictive.
For athletes returning to cutting sports, tape can be a cue, but it shouldn't replace balance work, hopping drills, calf strength, and landing control.
A lot of runners also like using tape during the transition back to mileage. If that's you, pair it with a smarter load progression. These physical therapy exercises for runners are a better long-term play than relying on tape every time your knee or calf complains.
After you've seen one clean example, video can help more than another written cue. This walkthrough gives a useful visual reference:
Low back support for posture and training tolerance
For the low back, think of tape as a posture reminder, not a spinal brace.
A basic option uses two long I-strips:
- Bend slightly forward or position the trunk comfortably.
- Place one strip along each side of the low back muscles.
- Keep the anchors relaxed and use mild tension only through the middle.
- Stand up, move, and check whether it helps you notice posture sooner.
This is often helpful for athletes who say, “I start practice fine, then I lose position as I fatigue.” Dancers and gym athletes sometimes respond well to this because the tape gives them immediate feedback when they drift out of their stacked posture.
If a back application makes you feel compressed, twisted, or more painful, take it off. Good tape should guide movement, not fight it.
What the Evidence Says About Kinesiology Tape
A parent asks after a game, “Will this tape fix it so my kid can play this weekend?” The honest clinical answer is narrower than the marketing. Kinesiology tape can help some athletes feel better or move with better body awareness for a short window, but it does not repair tissue, stabilize a true ligament injury, or replace rehab.
That pattern shows up in the research.
A 2018 systematic review on sports performance found very limited support for kinesiology tape as a performance tool. Across many comparisons, only a small number showed a meaningful advantage for kinesiology tape. In several cases, other taping methods performed better, and some comparisons showed no benefit at all, according to the 2018 Reneker review on sports performance.
That lines up with what we see in clinic. An athlete may report less pain during cutting, jumping, or practice drills, yet their sprint speed, power, or endurance does not change much. Those are different goals, and tape is more useful for the first group than the second.
Another review looking at healthy active people reported mixed short-term results for athletic performance. Some studies found small immediate improvements after taping, while others found no meaningful change. The authors concluded that current evidence does not support kinesiology tape as a reliable way to improve performance in healthy individuals, based on this systematic review of kinesio taping and athletic-based performance.
For athletes, that leads to a practical rule. Use tape when the goal is pain modulation, movement cueing, or helping an irritated area tolerate practice a little better. Do not use it expecting a structural fix.
That distinction matters. If a knee hurts because training load spiked, tape may calm symptoms enough to get through modified activity. If the knee keeps buckling, locking, swelling, or giving way, tape is not the right answer by itself.
So the smart way to judge tape is simple:
- Good reason to try it: short-term pain relief, proprioceptive feedback, better tolerance for a drill or practice
- Poor reason to rely on it: expecting stronger joints, healed tissue, or a guaranteed performance boost
- Best test: apply it, move for a few minutes, and judge whether function improves
If it helps, keep it in the toolbox. If it does nothing, change the plan.
Common Taping Mistakes and How to Fix Them
Most taping problems are fixable. The trick is catching the mistake before you blame the tape itself.
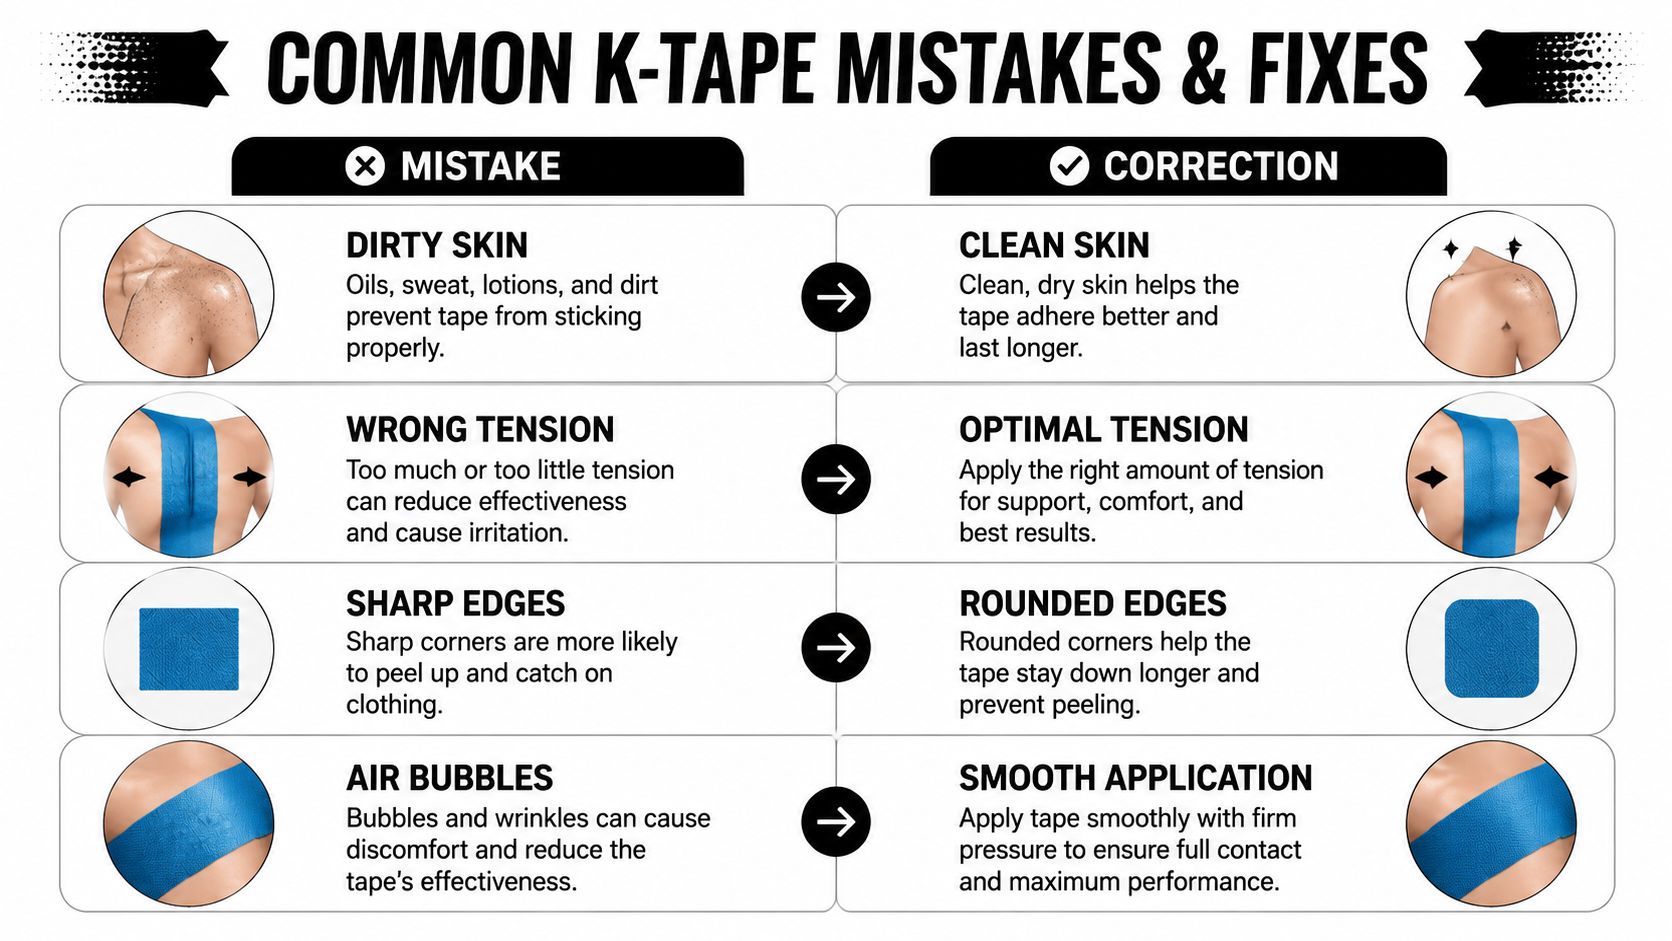
The errors we see most often
- Stretching the ends of the tape: This is the fastest route to skin irritation. Instead, leave the anchors relaxed and put any needed tension in the middle.
- Taping over sweaty or lotioned skin: The strip won't hold, then people add more tension to compensate. Clean and dry skin first.
- Wrapping too tightly around a limb: Kinesiology tape should move with the body, not act like a cinch strap. If the area feels compressed or irritated, remove it.
- Leaving wrinkles and air bubbles: Those spots lift early and can rub. Smooth the strip down as you go.
- Using sharp corners: Corners catch on clothing and peel. Round them before application.
- Ripping tape off aggressively: That can irritate the skin more than the injury did. Peel slowly and stop if the skin reacts.
- Using tape instead of solving the underlying problem: If the athlete still has poor landing mechanics, limited ankle motion, weak calf strength, or overloaded training volume, tape won't fix that.
Quick fix: If a tape job feels worse after a few minutes of movement, don't try to “push through it.” Remove it and reset.
A clean, comfortable application usually beats a fancy one.
When Tape Is Not Enough See a PT
A common sports medicine conversation goes like this: the tape helped during practice, but the pain came back after, or the athlete now feels like they cannot play without it. That is usually the point where I want a closer look.
Kinesiology tape can be useful for short-term pain relief, body awareness, and confidence with movement. It does not repair a tendon, tighten a loose ligament, correct a major strength deficit, or clean up poor landing mechanics by itself. Used well, tape supports a goal. It does not replace a diagnosis or a rehab plan.
A PT visit makes sense when the pattern is no longer simple:
- Pain is getting worse: during practice, after games, or the next morning
- You keep taping the same area: but speed, power, or tolerance for sport is not improving
- The joint feels unstable or gives way: especially at the ankle, knee, or shoulder
- There is swelling, loss of motion, or clear weakness: those findings need more than a tape job
- You are returning after surgery or a significant injury: the plan should match healing timelines and sport demands
- Movement looks off: cutting, jumping, throwing, sprinting, or lifting may need coaching, strength work, or load changes
The decision is not just "does tape help a little?" The better question is "what is the athlete trying to get from it?" If the goal is to calm symptoms enough to practice with better mechanics, tape may be a reasonable short-term tool. If the goal is to hold a joint together, prevent reinjury on its own, or push through pain that is trending the wrong way, that is poor use of tape.
I see this with high school athletes all the time. A basketball player tapes an ankle before every game and assumes that means the problem is managed. Then we test balance, calf strength, ankle motion, and landing control, and the underlying limiter shows up fast.
For older family members comparing care options for musculoskeletal pain, this overview of physiotherapy vs chiropractic for seniors can help frame what each approach tends to focus on.
If you are unsure whether self-taping is enough, start with this guide on how to know if you need PT. Uncertainty, repeated flare-ups, or growing reliance on tape are all reasonable reasons to get checked.
Frequently asked questions
Q: How long should kinesiology tape stay on?
A: For sports use, shorter wear with reassessment is usually safer. Check the skin daily and remove it sooner if it starts to itch, burn, or peel unevenly.
Q: Should tape feel tight?
A: No. You should feel the tape on the skin, but it should not pinch, throb, or limit normal motion.
Q: Can tape prevent injury by itself?
A: No. It may improve awareness or reduce symptoms for a period of time, but injury risk is affected more by strength, technique, workload, recovery, and return-to-sport readiness.
Q: Is kinesiology tape good for runners and dancers?
A: Sometimes. It can be helpful as a short-term cue while training is adjusted, but it works best when paired with movement analysis and load management.
Q: When should an athlete stop self-taping?
A: Stop if the skin reacts, symptoms worsen, the area feels unstable, or tape has become the only reason the athlete feels able to practice or compete.
If you're an athlete, runner, dancer, or post-op patient in Bridgewater, Buzzards Bay, Middleborough, or the surrounding South Shore Massachusetts towns, Physical Therapy U can help you figure out whether kinesiology tape fits your problem. Our licensed DPTs use taping as one tool inside a bigger sports rehab plan that may include running gait analysis, dry needling, dance therapy, strength work, and return-to-sport testing. Book an evaluation and get a clear plan that matches your sport, your injury, and your goals.